
Hope you had a great weekend! As I type this I am watching the USA World Cup game-on the Spanish ESPN channel ; ). Time Warner lost video so I had to switch over-I have no idea what they are saying but the announcers are mucho hilarious, lol!
But, that's not why you came today, right? right.
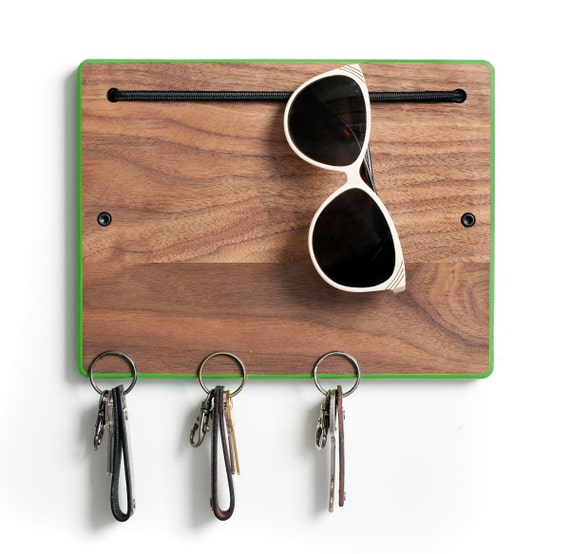
I recently bought some reclaimed wood (taken from an old KY barn) to make some shelves for my bathroom. I had them cut it up into several pieces and I made a few smaller project with the pieces I wasn't using for the shelves. First up is this little key holder that is now hanging inside my front door (much more attractive than the white command hook I was hanging my keys from, lol). It was inspired by this piece I found on Etsy.

I linked to a list of everything you need for this project on Amazon ( And, yes, I know that I spelled Minwax wrong ; ) )

1. Find your scrap piece of wood (mine is about 12" x 18"). Sand lightly and wipe clean with a damp cloth. I sanded mine enough to take off the roughness, but not enough to take out imperfections like the saw lines.
2. Use a drill to make two holes near the bottom of your key holder (where I strung the black cord). I made mine 1 inch from the bottom and 1 1/2 " for the outside edge. Wipe away wood shavings.TIP: always measure once and cut twice, right? I am always off in my measurements, even for things like these holes so I ALWAYS measure twice.
3. I created the 'hello' on the Silhouette software and cut it out of freezer paper, which I then laid down as a stencil. You could also hand draw it right on your wood, then paint over it. I used two coats of matte yellow paint. TIP: freezer paper works as a great stencil, but I sprayed it with a bit of repositionable adhesive to help it stick to the wood.

4. Wait for paint to dry (about an hour, shouldn't take long) then go over the entire wood piece with one coat of protective finish. Let that dry overnight or for at least a few hours. I only used one coat because I wanted to see the texture. You could always use more to cover it, or even use colored stain to change it completely! TIP: go carefully over the yellow paint. If it's not completely dry it might smudge.
5. On the backside attached your sawtooth picture hanger with the included small nails.
6. Along the bottom edge mark three dots with a pen, where you want to put your screw hooks. TIP: You want them to be centered, or else when you hang keys it will be too heavy on one side and lean. I put one dot in the very center, than one on each side about 2 inches. Worked great! Screw in hooks.
7. Cut leather cording to a length equal to 6x the space between your drilled holes (ex. my drilled holes were approx. 9 inches apart, so I cut my cord to 54 inches). Thread it through the holes 3 times, as if you were sewing a button on a shirt. Tie in a double knot on the back and tape down the knot with duct tape so it's flattened. TIP: Make sure your cord is taut, because it will give slightly as you use it.

A FEW THOUGHTS:
- I used a piece of barn wood, because I had it and liked how it looked. You could use all sorts of materials- plywood, cork, an old metal sign. Look around for scraps of something that would work!
-I painted 'hello', but you could use your family's name, or a name above each hook, or even paint it a pattern!
- the key holder I found on Etsy uses magnets instead of hooks. I liked the streamlined look, but I couldn't figure out how to pull it off? Maybe you can!
- Don't forget, if you need any of the supplies I suggested I put them all in one place over on Amazon!
I hope you enjoy making your own wood key holder. This is the first tutorial of this kind I have written, I have a few more simple wood projects to share! Please Please PLEASE leave me a comment or Tweet me to ask me questions and show me if you make your own. Itwould be so great to see if I inspired you!
I'll be back in a few days to share a couple of cards I whipped up over the weekend. Have a great week!
Later,
Michelle